
5 Ways of Magic Ring/Magic Loop
Starting a crochet project in the round can feel tricky for beginners. Traditional four-chain methods often leave a hole in the center, which isn’t always ideal. That’s where the magic loop — also called the magic ring — comes in. But basically it is a crochet starting circle.
This clever adjustable circle allows you to pull the center tight so there’s no gap, giving your work a neat, professional look. In this guide, we’ll explore the history of the magic loop, how it got its name, the symbols and abbreviations you’ll see in patterns, the types of projects it’s used for, and finally five different ways to make it. Each method includes a short video so you can follow along step by step.
A SHORT HISTORY OF THE MAGIC LOOP
The magic ring technique started appearing widely in crochet literature and online tutorials in the early 2000s, though versions of adjustable starting loops have existed much longer. It gained popularity with the rise of amigurumi (the Japanese art of crocheting small, stuffed toys) because amigurumi projects require a tightly closed ring at the start.
The term “magic ring” became common in written crochet patterns, while “magic loop” spread through online video tutorials, since it describes the action of forming a loop with yarn. Today, both names are used interchangeably in crochet communities.
Note: Magic loop in knitting refers to a completely different technique (using a circular needle to knit small circumferences). But in crochet, “magic loop” and “magic ring” mean the same thing.
ABBREVIATIONS AND CROCHET SYMBOLS IN CHARTS
Different designers may use slightly different abbreviations, but you’ll most often see:
MR = Magic Ring
ML = Magic Loop
Sometimes designers choose to write it out fully: “make a magic ring” or “start with an adjustable loop”. It mostly depends on the difficulty level of a pattern and the author's style.
In crochet charts, the magic ring is usually shown as a small circle or oval in the center of the design. A solid circle or a perfprated circle can be used for graphically identifying this technique. Sometimes it is also labeled with MR or ML and/or labeled with a number of stitches that radiate outward.
WHEN TO USE THE MAGIC LOOP
The Magic Ring/Loop is useful in almost every project that starts in the round:
Amigurumi (stuffed toys)
Granny squares and motifs
Hats and beanies — in top-down hat projects
Doilies and mandalas
Circular bags, baskets, and coasters
1 CROSS-OVER METHOD
The cross-over method is an approach where yarn strands cross over your two fingers perpendicularly to each other to form the loop.
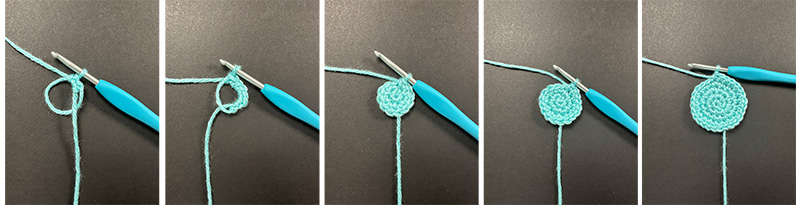
Check out a tutorial for this method. Notice that all of the following videos will show you how to make 6 single crochet stitches into the Magic Loop. This is done to help guide you through the most difficult part of the Magic Loop - keeping it together until the ring is firmly sinched.
The short tutorial is here:
2 FINGER WRAP METHOD
In this method, you wrap yarn around your pointer finger almost twice and then pull left wrap under the right wrap with your hook.
This is the short tutorial:
3 TWISTED METHOD
The twisted method is very fun to do. Without using the hook, you loops the yarn making a yarn-twist with your fingers, then work through that loop using the hook.
Watch the tutorial here:
4 HAND SLIP KNOT METHOD
This technique starts with a handmade slip knot. It can be most intuitive method for those who begin all of their crochet project with a hand-made slip knot. When the slip knot is made, a small and exact motion with a hook will finish the rest of the magic loop.
And here is the tutorial:
5 HOOK SLIP KNOT METHOD
With this variation, you begin with a slip knot directly on your hook, then shape it into an adjustable loop. It’s tidy, fast, and great for crocheters who prefer minimal finger wrapping.
The YouTube short is right here for you:
The magic loop (or magic ring) is one of the most versatile crochet techniques for working in the round. While there are several ways to form it, the result is always the same: a neat, adjustable circle that makes your projects look more polished.
Experiment with all five methods and find the one that feels most natural to you. And if you want to dive deeper, visit CrochetConnect.com for more tutorials, tips, and crochet inspiration.
Which method is your favorite? Let us know in the comments below!

Written by
Arina Purcella
Comments 0
You must be logged in to post a comment. Log in .